Week Ten: Balance
Leave a commentSeptember 17, 2015 by libraryheather
Program Title: Balance
Target Age Range: Grades 1-3
Program Length: 60 minutes
Brief Description:
An exploration of balance through understanding that everything has a center of gravity and making simple balances.
Supplies:
Plastic coat hangers (1 per participant)
12oz paper cups with holes punched in opposite sides (2 per participant)
Single hole puncher
Scissors
String or yarn (4 12” pieces per participant)
Variety of small objects for testing the homemade balances (e.g. marbles, toy cars, rocks, etc—whatever the library has around!)
Masking tape (1 roll per table, plus one for demonstration purposes)
2 brooms or mops (or other objects with long handles)
4 extra chairs
Balancing robot template printed on cardstock (1 per participant, plus a few extras just in case)
Pennies (2 per participant)
Pencils with unused erasers (1 per participant)
1 package sticky tack
Hammer (for demonstration purposes)
Pen or pencil (for demonstration purposes)
Computer with internet access
Projector with sound hookup and screen
Optional: “The Man Who Walked Between the Towers” – Mordicai Gerstein
Optional: Washable markers or crayons for decorating the balancing robot
Cost: $0-50
Advanced Preparation:
-Use a single hole punch to make holes in opposite sides of each paper cup.
-Cut 12” pieces of string or yarn. You will need four pieces per participant.
-Knot the strings securely through the holes of each cup (two strings per cup).
-Cut out one robot template per participant.
-Practice balancing objects for the demos!
-On the day of the program, use masking tape to attach brooms to the tops of two chairs each. Place the small objects you’ve gathered for the homemade balances beneath the broom. These will act as stations where participants can hang their balances and test them out.
Program Outline:
1. Settling in: 5 minutes
2. Welcome, introductions, science discussion & balance demo: 15 minutes (Details below in Special Instructions and Procedures)
3. Human balance experiments, tightrope walker discussion & video: 10 minutes (Details below in Special Instructions and Procedures)
4. Balancing Robot project: 10-15 minutes
5. Homemade Balance project: 15-20 minutes
Handouts:
Balancing robot template printed on cardstock (1 per participant)
Special Instructions and Procedures:
Introductory Discussion:
What is balance? How do things stay balanced?
Center of Gravity Discussion and Activity:
Introduce the concept of center of gravity. Demonstrate how each object has a center of gravity by attempting to balance a pencil or pen, hammer, and roll of tape on your finger. Discuss how the best way to prevent objects from tipping over is by lowering their center of gravity. An analogy they understood well was how football players crouch lower when they’re expecting to be tackled.
Where is a person’s center of gravity? How can we prevent ourselves from falling over? Hint: you’re doing it right now (sitting down). What does sitting do? It lowers your center of gravity.
Experiment with lowering your center of gravity. Have them start off standing and leaning over to the side as far as they can without falling over or extending their leg. Then, try sitting in chairs and doing the same thing. They should be able to lean over farther while sitting because they’ve lowered their center of gravity.
Human Balance Activity:
Have everyone stand and space them out evenly around the room (not near tables and chairs), so that they don’t fall into each other. As inspired by Science Dad on ScienceFriday, have them experiment with their own sense of balance by doing the following:
a) Balancing on one foot with their arms by their sides.
b) Balancing on one foot with their arms by their sides, then tilting their head over to one side (this should affect their center of gravity by moving the heaviest part of their upper body).
c) Balancing on one foot with their arms straight out at their sides (this should make it easier to balance, because they are increasing their rotational inertia—this is a very complicated concept, so we left it at that and said they’d learn more about it in their high school physics class. As long as they understand that putting your arms out helps you balance better, that’s all that matters!).
d) Balancing on one foot with their arms straight out at their sides, then closing their eyes. (This should make them tip over pretty much immediately!)
Have everyone sit down while you explain how human balance works (the fluid and hairs in our inner ears). It’s also fun to talk a little bit about motion sickness and how to combat it when you’re in a car.
Tightrope Walker Discussion and Video:
How do tightrope walkers balance on the high wire? Explain how the long poles that they carry increase their rotational inertia (like when they held their arms out while balancing on one leg), and also work to lower their center of gravity.
Tell them about Philippe Petit’s illicit walk between the towers of the World Trade Center in 1974. If you have time, you could read “The Man Who Walked Between the Towers” – Mordicai Gerstein instead.
Then, show them this video clip from the nightly news in 1974. Afterward, you can talk about how it was probably very windy up there, which makes it even harder to balance—that’s why the pole he carried was so important.
We emphasized that tightrope walkers have MANY years of practice and that it’s a completely dangerous activity–and therefore, they should NOT try anything of the sort without parental permission. Just in case!
Balancing Robot Project: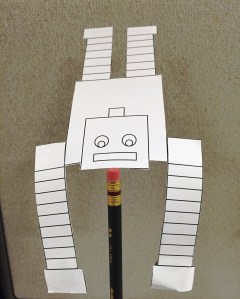
Do the Balancing Robot project. Do not give them pennies and sticky tack at first—just tell them to try getting it to balance on their finger. When it’s clear that it won’t work, ask why not and what you might need to make it balance. If they’re not getting it, hint at what they just learned about the weight of tightrope walkers’ poles. Hand out the pennies and sticky tack, but don’t tell them where to put it. If they’re having trouble, ask where they might put the pennies to lower the robot’s center of gravity, if they pretend that their finger is a tightrope and the robot is a tightrope walker.
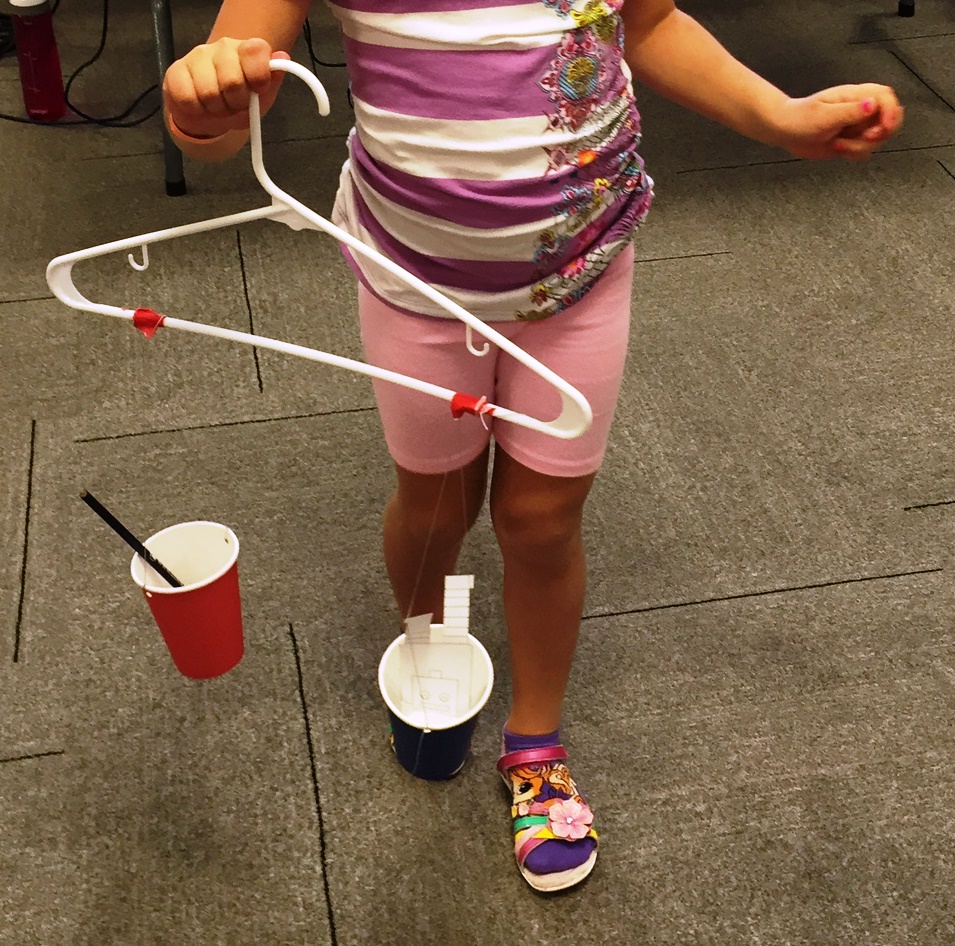
Homemade Balances:
Use the last 15 minutes to make homemade balances. Try to have them work in pairs, where one person holds up the hanger while the other tapes the cups on so that they hang evenly. You will probably have to help them out with this task. When they are done, invite them to use the testing stations until the program ends.
Resources Used:
Explain That Stuff: Center of Gravity
Science Buddies: How to Balance Anything
PBS: Activity Guide: Center of Mass
YouTube: Tightrope Walk Across World Trade Center (1974)
Buggy and Buddy: Balancing Robot
Let’s Explore: Make a Hanger Balance
Home Science Tools: Mass & Weight: Make a Balance
Science Dad on the Sense of Balance
The Christian Science Monitor: Grand Canyon Tightrope Walk: What Was That Huge Pole For?
Suite.io: Why Tightrope Walkers Carry Long Bent Poles
BBC – Future: Why Do We Get Car Sick?
University of Minnesota Masonic Children’s Hospital: The Inner Ear: Understanding the Balance System
The Royal Institution – ExpeRimental – More Info About Balancing Sculptures
The Royal Institution: Balancing Sculptures
Newton’s Apple: Tight Rope Walker
Additional Resources:
Science Net Links: Balancing Points
Science Net Links: Let’s Make a Balanced Mobile!
Kiwi Crate: Butterfly Balancing Act
Highlights Kids: Seesaw Moment
JDaniel4’s Mom: Turtle Balancing
Kids-Earth-Science.com: Gravity Experiments Balancing Acts
Hunkins Experiments: Balance a Chair on a Broomstick
Steve Spangler Science: Balancing Utensils Table Trick
LoveMyScience.com: Stand Alone Broom Center of Gravity Experiment
Steve Spangler Science: Balancing Hex Nut Challenge
Sublime Science: The Balancing Can Experiment
The Indianapolis Public Library Kids’ Blog: Center of Gravity – Fork on a Glass; Balanced Pop Glass
Science With Kids: Center of Gravity Experiment
How Stuff Works: Balance and Gravity Test
eHow: Center of Gravity Experiments for Kids
What we would do differently:
We would have sought out thicker cardstock for the Balancing Robots project. You’ll notice from our photos that the robot is balancing, but balancing perilously! This is because the cardstock was pretty lightweight. Next time!
Overall, balance was a challenging concept for this age group. The projects were perfect for 1st-3rd graders (the balancing robot looks like magic, and the balances—while a bit difficult to make even—are fun to play with), but the science is hard for them to understand. They understand gravity and balance, but the “why” of balance proved elusive, despite repeated examples of lowering the center of gravity to maintain balance. Thus, we would recommend not attempting to explain anything in more depth than we did. Perhaps less explanation in general and using time to do a simple project like Balancing Turtles or Seesaw Moment would be better.
Adaptation for older/younger audience:
The science behind balance would be well understood by 4th-6th graders, and they could try more challenging experiments, such as building balancing sculptures or mobiles. While younger kids would surely enjoy some of the fun balance demonstrations linked above (such as Balancing Forks), older kids would both appreciate the demonstration and the science behind how it works—that is, it would be more worth your time to master the skills needed to carry out that demonstration so you could adequately explain the science.
