Week Thirty: Fingers of the Hand
1October 15, 2015 by libraryheather
Program Title: Fingers of the Hand

Target Age Range: Grades 4-6
Program Length: 90 minutes
Brief Description:
Learn about the bones in our hands and make a working “mechanical hand.”
Supplies:
Craft sticks (5 per participant)
Drinking straws (10 per participant)
Twine, string, or yarn that will fit through the straws (5 long pieces per participant)
Pony beads (10 per participant)
Scotch tape or masking tape (at least 1 roll per table)
Ruler (preferably 1 per participant, but at least 1 per table)
Scissors (1 per participant)
Lightweight wood paint paddles (1 per participant–we liked the ones that Ace Hardware had)
Hot glue gun OR wood glue
Ziploc sandwich bags
Fingers of the Hand Instructions (1 per participant)
Computer hooked up to a projector with sound
Cost: $0-50
Advanced Preparation:
-Make a model. This will be helpful for you and them.
-Cut craft sticks into relatively uniform small, medium, and large pieces (for the distal, intermediate, and proximal phalanges). You will need to make 5 small, 4 medium, and 5 large for each participant–but it is very helpful to have extras, as craft stick pieces break easily.
-Cut paint paddles into three pieces for the wrist bones (as shown in the picture to the right). The original instructions say to “cut the paddle in half, then cut one of the halves into two pieces, with one piece ~1″ shorter than the other.” You will need to make three pieces per participant.
-Cut 16″ pieces of twine/yarn/string. Make 5 per participant. These will be the “flexor tendons.”
-Separate all the necessary “phalanges” (pieces of craft sticks), “metacarpals” (whole craft sticks), “wrist bones” (pieces of paint paddle), “flexor tendons” (string/twine/yarn), straws, and pony beads into a Ziploc baggie. Make up 1 baggie per participant.
-If you have extra “phalanges” (which we recommend making!), separate them into labeled baggies.
-Print out Fingers of the Hand Instructions.
Program Outline:
1. Settling in, welcome, introductions: 5 minutes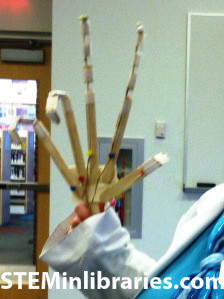
2. Discuss what our bones do for us, what our bones are made of, how many bones there are in our bodies overall, and ask which body part has some of the most bones in our bodies (the hand!). Discuss the bones of each finger and the wrist, as well as their proper names. Explain how muscles and tendons move our bones, and explain the difference between flexor and extensor tendons: 10 minutes
3. Watch this extremely short, catchy video about the bones of our hands and feet: <1 minute
4. Explain the project and show the model hand you made. Point out where each of the bones are on the model. Be sure to let them know two things before they begin: 1) they must read the written directions you hand out, and 2) this project takes a while to do, so they might not be able to finish–but they can take it all home: 5 minutes
5. Build models of the hand: ~70 minutes
Handouts:
Fingers of the Hand Instructions
Special Instructions and Procedures:
Science Discussion:
One of the best explanations of how our bones are structured (as well as many other interesting facts about our bones!) can be found at KidsHealth.org.There is good information about the number of bones and names of the bones on the Women and Children’s Health Network website. While explaining the different bones in the hand, we found it helpful to project this image from Science For Kids.
We told them that our flexor tendons help us flex our fingers, whereas our extensor tendons help us extend our fingers back out. Hopefully it was a useful mnemonic device!
When we showed the model and identified the different bones on it, this is what we said (after consulting with Dr. Noto and Dr. Ostrowski, who teach anatomy courses at UW-Parkside): “On this model, the craft sticks are our bones (except, we don’t have 8 wrist bones on the model–just 3). The twine acts as our flexor tendon. The straw segments on the front of the hand are connective tissues that hold the tendon in place. When I pull the flexor tendon down and the finger bends, I am acting as a muscle. Lastly, the straw on the back of the hand is acting in the place of a few things—it’s partly the extensor tendon, as well as the joints between phalange bones, and it’s providing tensile support the way that muscles, tendons, and ligaments would on the back of the hand. So, while this model isn’t a perfect replica of a hand—it’s nowhere near as cool or flexible!—it’s a decent representation!”
Building Project:
If they finish building all 5 fingers, do all of the necessary hot gluing for them!
Resources Used:
“Stomp Rockets, Catapults, and Kaleidoscopes: 30+ Amazing Science Projects You Can Build for Less Than $1” – Curt Gabrielson
YouTube: Hands and Feet Bones Song
Women and Children’s Health Network: Your Wonderful Hands
Science For Kids: Bones in the Hand
Dr. Christopher Noto and Dr. Summer Ostrowski from UW-Parkside
What we would do differently:
Nothing. This worked very well as-is. Many of the participants even finished their hands within the time allotted!
Adaptation for older/younger audience:
Would not recommend for a younger audience (we think the project would be too difficult and/or tedious). Could be done with an older group, perhaps in conjunction with building other fake body parts (e.g. eyes, lungs, hearts).
Modified instructions for “Fingers of the Hand” were reprinted with permission from pages 124-128 of “Stomp Rockets, Catapults, and Kaleidoscopes: 30+ Amazing Science Projects You Can Build for Less Than $1” by, Curt Gabrielson and the City of Watsonville (Chicago Review Press, 2008). Please check out a copy of “Stomp Rockets, Catapults, and Kaleidoscopes: 30+ Amazing Science Projects You Can Build for Less Than $1″ by, Curt Gabrielson.
It’s full of fantastic projects!
Ideas for material substitutes and process changes are attributed to The Mount Prospect Public Library’s presentation at a LACONI YSS program in 2013.

I’m eager to try this really cool activity with my tween STEM club! But I’m a bit confused on the supply list. It says here that you only need 5 craft sticks per participant, but in the instructions link it says that AND 5 “proximal phalanges” (large pieces of a craft stick), 4 “intermediate phalanges” (medium pieces of a craft stick), and 5 “distal phalanges” (small pieces of a craft stick). How many craft sticks is that total per participant?