Week Thirty-Three: Hydraulic Butterflies
Leave a commentOctober 16, 2015 by libraryheather

Program Title: Hydraulic Butterflies
Target Age Range: Grades 4-6
Program Length: 90 minutes
Brief Description:
Learn how a little water can go a long way in a physics-filled program that lets you create your own hydraulic butterfly.
Supplies:
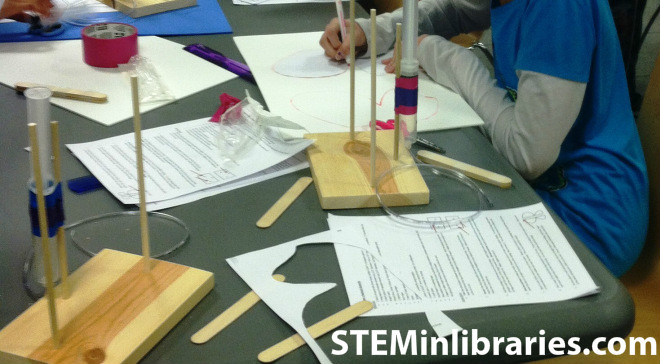
5.5 x 8″ wood baseboard with three 15/64-inch holes drilled near the edges in a triangular pattern (1 per participant)
24″ wooden dowel rod (1/4″ diameter), cut into 3 pieces–2 long, 1 ~1″ shorter than the long pieces (1 rod/3 pieces per participant)
Wood glue, Elmer’s glue or Tacky Glue (1 per table)
30cc Luer Lock Syringes without needles (2 per participant)
Duct tape (1-2 rolls per table)
Clear, flexible acrylic tubing (1/8″ inner diameter x 3/16″ outer diameter) (2 feet of tubing per participant)–we found a box with a big roll of this tubing by visiting an American Science and Surplus.
Ruler (preferably 1 per participant)
Scissors (1 per participant)
Butterfly wing templates, roughly 5×7″ (1 per participant)
12×18″ 3mm colored foam sheet (1 per participant)
Pen, pencils, or markers for tracing (1 per participant)
Jumbo craft sticks (7 per participant)
Scotch tape or masking tape (1 roll per table)
Large bowl or container full of water
Hot glue gun
Assorted decorations for wings (pompoms, yarn, more foam, markers, googly eyes, etc)
How to How to Make a Hydraulic Butterfly instructions (1 per participant)
Cost: $$50-100
Advanced Preparation:
-Make a model hydraulic butterfly. This will help you and the participants.
-Draw a butterfly wing outline that is roughly 5×7″ (for just one wing). Make copies and distribute 1 copy to each participant to cut out and trace for their project.
-Cut a ~5.5 x 8″ piece of wood for each participant’s base.
-Drill three 15/64″ holes near the edges in a triangular pattern on the pieces of wood. The holes on the outer edges support the two butterfly wings, so make sure that the holes are positioned properly with the size of your butterfly wing outlines.
-Cut a 24″ wood dowel into three pieces–2 long pieces of the same size, and 1 piece that is at least 1″ shorter than the longer pieces. Cut a dowel into 3 pieces for every participant.
-Print out How to Make a Hydraulic Butterfly instructions (1 per participant).
Program Outline:
1. Settling in, welcome, introductions: 5 minutes
2. Describe the project and explain what hydraulics are.
3. Explain how hydraulics work by addressing the following concepts:
- Fluid pressure
- Fluid pressure’s mathematical expression P = F/A, this short Egg Walk video, and a summary of how to calculate P = F/A.
- Units of pressure are “Pascals.”
- Compressible (gases) vs. Non-compressible (water)
4. Watch this video: Hydraulics and Pneumatics, Part 1 (stop at 5:38 in video)
5. The video gave some examples of the way hydraulics affect our lives. What other types of machines might use hydraulic systems? Why do you think these giant machines use hydraulic systems?
6. Show model of hydraulic butterfly and reiterate how pushing the plunger down on the syringe causes the plunger on the other syringe to rise.
7. Make Hydraulic Butterflies: 60 minutes
Handouts:
How to Make a Hydraulic Butterfly instructions
Special Instructions and Procedures:
Science Discussion:
The place we got the majority of our information was Nucleus Learning: Teaching the Hydraulics and Pneumatics Unit to Children. Not only does this outstanding lesson plan include a discussion of pressure, fluid pressure, P = F/A, and compressible vs. non-compressible, but it also brilliantly linked to The Egg Walk video. We used the principle outlined in The Egg Walk video to show how P = F/A works.
To help with your own personal understanding of hydraulics and how P = F/A is calculated, we highly recommend watching these two videos: Hydraulics: GCSE Revision and Principle of Hydraulic Lift. Also, if you’re like me and never took a Physics class, it’s helpful to read literally everything you can get your hands on, such as Edinformatics.com, PrimaryScience.ie, TeachEngineering.org, GSU.edu, and more. Mostly, though, Nucleus Learning’s lesson plan on hydraulics is what saved our bacon.
We also used a demonstration to illustrate the concept of compressible vs. non-compressible, as found on Nucleus Learning.
When we reiterated how hydraulics worked in regard to our model, we said: “What will happen when I apply force to the plunger on the free syringe? Yes, the water will go through the tubing and cause the plunger on the fixed syringe to rise–but why? Because when water is in a confined system like this, it is non-compressible. So, when force is applied to the plunger of the free syringe, pressure is exerted equally in all directions within the syringe and tubing, and stays the same as it reaches the fixed syringe—which makes the plunger of the fixed syringe rise.”
Project:
Even though everyone built their own butterfly, we asked the participants to find a partner to help throughout the project (with things such as measuring and cutting the plastic tubing).
We made it clear that there were to be no water fights, and that they were not allowed to use the hot glue guns. We did all the hot gluing for them (and got burned a few times, which helped prove why we should be doing that, not them).

Resources Used:
“Stomp Rockets, Catapults, and Kaleidoscopes: 30+ Amazing Science Projects You Can Build for Less Than $1″ by, Curt Gabrielson
TeachEngineering.org: Lesson: Fluid Power Basics
Nucleus Learning: Teaching the Hydraulics and Pneumatics Unit to Children
YouTube: Principle of Hydraulic Lift
YouTube: Hydraulic and Pneumatic, Part 1
YouTube: Hydraulics, GCSE Revision
Edinformatics.com: Pascal’s Principles and Hydraulics
PrimaryScience.ie: Air and Water Power
Additional Resources:
Navigating By Joy: Hands-On Hydraulics: Science Fun for Kids
Middle School Activities on Pascal’s Principle
MSNucleus.org: Sixth Grade Physics
What we would do differently:
The original instructions did not specify what size or type of syringes to purchase. We got 30cc syringes, because we figured it would be better to have 30ccs of water to push through 2 feet of tubing. This probably doesn’t matter at all for the purposes of the project. 30cc syringes are quite tall, and 10-20cc syringes would likely fit much more easily on the shorter dowel rod. Our suggestion is to get your hands on two 10cc and 20cc syringes and make sure they both work with 2 feet of tubing–then make your choice.
Additionally, the science was kind of difficult for the younger participants, and it took a long time to explain. That extra time would’ve been useful for making the projects. So, we suggest finding parts of the explanation to simplify or eliminate. Perhaps take out P = F/A entirely.
Adaptation for older/younger audience:
This is definitely NOT recommended for a younger audience. Middle and high schoolers, however, would be great at this and the science would be less difficult for them. A high school-level project could involve learning about the principles of hydraulics, giving them the tubing and syringes, and letting them design their own project (like a jack in the box).
Modified instructions for “Hydraulic Butterflies” were reprinted with permission from pages 98-103 of “Stomp Rockets, Catapults, and Kaleidoscopes: 30+ Amazing Science Projects You Can Build for Less Than $1” by, Curt Gabrielson and the City of Watsonville (Chicago Review Press, 2008). Please check out a copy of “Stomp Rockets, Catapults, and Kaleidoscopes: 30+ Amazing Science Projects You Can Build for Less Than $1″ by, Curt Gabrielson.
It’s full of fantastic projects!
