Week Fifty-Eight: Batteries, Electricity and Creative Circuits
Leave a commentJune 26, 2016 by WittyLibrarian
 Program Title: Tween Science: Batteries, Electricity and Creative Circuits
Target Age Range: Tweens, Grades 4-6
Program Length: 90 Minutes
Brief Description: Explore how batteries work, electricity flows, and how to combine the two into really creative circuits.
Supplies:
Coin cell batteries
Copper tape
Conductive Paint (Optional)
Circuit Scribe conductive ink pen
Copper tape
LEDs
Paper
Card stock
Pencils
Markers
Decorative craft items (stickers, jewels, foam pieces, etc.)
Pennies
Aluminum foil
Paper towels
Vinegar
Masking tape
Alligator clips
Eye droppers
Cost: $-$$
Program Outline:
- Introduction to electricity and batteries. We found Explainthatstuff.com’s explanation of both batteries and electricity to be the best source for understanding and explaining the science behind the two topics.
- Make a homemade battery.
- Explanation of circuits and circuit diagrams. Bulbs.com has a great explanation on circuits and the BBC’s KS2 Bitesize website has a simple chart outlining circuit diagram symbols.
- Make a copper tape/paper circuit.
- Make a conductive ink/paper circuit.
Procedure:
- Make a homemade battery
 We separated the participants into groups of 4 to complete this project. Each group was given a set of instructions and the supplies necessary to complete the battery, with the exception of the vinegar. The vinegar was passed out as needed, to prevent accidental vinegar spillage. The groups had moderate success with creating the batteries- it was split fairly evenly between groups that got their battery to work and those that didn’t. Of the groups that got their batteries to work, the LED was faintly lit. Of those that weren’t successful, the cause was most likely lack of a secure connection- the foil being too loose or not wrapped correctly. Despite not all batteries working, each group enjoyed troubleshooting the problems.
- Make a copper tape/paper circuit
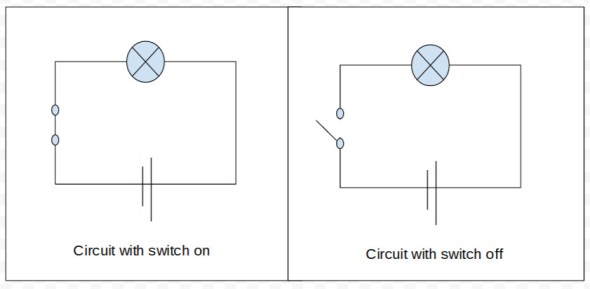
A paper circuit works by using conductive material (either copper tape, wire, conductive paint, or conductive ink) to connect the positive side of an LED (long leg of the LED) to the positive side of a battery, and then using another bit of conductive material to connect the negative side of an LED (short leg of the LED) to the negative side of the battery. It is important to ensure that the positive line of connection and the negative line of connection do not touch. If they touch, the circuit will not work (it will “short circuit” ?). A switch can be inserted anywhere in the circuit, so long as it is added in such a way that it completes the circuit when in use, and when not, it breaks the circuit. See diagram for example of a functioning circuit.
For more information on how copper tape circuits work, and for project samples, Sparkfun.com has two excellent resources: Paper Circuit Pin and The Great Big Guide to Paper Circuits.
We had the participants use their new knowledge of circuit diagrams to first draw out a design for a circuit on plain paper with pencil for their creative circuits, before giving them them the supplies for copper circuits (cardstock, batteries, LED, copper tape). After they put together their circuits, they decorated their circuits with markers and other odds and ends.
The circuits the kids made were very creative and fun, and worked well for the most part. It was discovered, however, that while multiple LEDs could be lit at the same time while directly touching the 3V coin cell battery, when spaced out in a correct circuit with copper tape, only one LED could be lit. This was a cause of frustration for some kids, who wanted a design with two or more LEDs on it.
Additionally, securing the battery to the circuit can be tricky. Some kids made a little pocket for the battery, making sure that some copper tape touched each side of the battery. Others decided to use the conductive paint as glue to hold the battery down, and then created a switch with a bit of paper and copper tape to touch the other side of the battery (the side not glued down with paint).
Note: Use caution when handling copper tape. Copper tape can cause cuts similar to a papercut, but deeper!
- Make a conductive ink/paper circuit
This project was run concurrently with the copper tape circuit, and we allowed 2 kids at a time to come up and draw a circuit with the Circuit Scribe pen. This was primarily done because the Circuit Scribe, while a fantastic product, is expensive and we could not purchase enough pens for each child to use. A circuit using the scribe works under the same principal as the copper tape circuit- negative to negative, positive to positive, and neither side should touch. The circuits the kids drew looked great and were simple to create. It should only be noted that kids should be encouraged to create thick lines.
Handouts:
Homemade Battery Instructions (A special thanks to 123homeschool4me.com for giving us permission to adapt their instructions in our instructions handout and post it here!)
Resources Used:
123homeschool4me.com’s Homemade Battery Science Experiment
Batteries on Explainthatstuff.com
Electricity on Explainthatstuff.com
BBC’s KS2 Bitesize website on Electrical Circuitse
How Electrical Circuits Work on Bulb.com
Sparkfun.com’s Paper Circuit Pin
Sparkfun.com’s The Great Big Guide to Paper Circuits.
What we would do differently:
This program ran very well as planned. Although some kids had trouble getting the battery to work, they enjoyed troubleshooting the issue. Many kids created multiple copper tape circuits, having fun making different designs. We would advise having lots of extra 3V coin cell batteries on hand- with multiple designs, we went through batteries fast. Some kids spent so much time on their copper circuits, that they ran out of time to try the conductive ink circuit, and, of the entire program, that part could be eliminated.
Adaption for older/younger audience:
For a teen audience, we would recommend eliminating the homemade battery portion of the program, and focusing more on the creative elements involved in using copper tape to create a circuit, as well as the conductive ink. If budget allows, add in using conductive paint as option to enhance a program for teens. The combination of tech and creativity makes this an ideal teen program.
For a younger audience, in grades 1-3, we would recommend doing a program that focused solely on either the battery or the copper circuits, but not both at the same time. The younger audience would be able to conduct either experiment, but would need more time than we allowed the tweens (grades 4-6). We have offered a copper tape program for younger grades, which we will posted shortly.
