REVISITED! Week Thirty-Three : Hydraulic Butterflies
Leave a commentJune 20, 2016 by WittyLibrarian
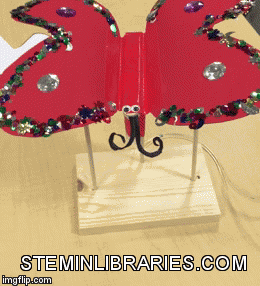 One of our favorite programs to present is our Tween Hydraulic Butterfly program– after all, participants leave with a truly spectacular flying butterfly! Alas, this is also one of our more daunting programs. The science can be fairly complex and advanced; the project, while seemingly easy to do, requires participants to follow instructions pretty precisely; and it requires a fair amount of hands-on help. What, then, is a librarian to do if they really want to make a flock of hydraulic butterflies again? Our answer? Involve the parents! The solution was, in a word, brilliant!
Read on for our modified Hydraulic Butterfly program, this time adapted as a Family Maker program!
Program Title: Family Makers: Hydraulic Butterflies
Target Age Range: Families with children in grades 3 and up
Program Length: 90 minutes
Brief Description:
Create a beautiful butterfly that soars thanks to the mechanics of hydraulics.
Supplies:
5.5 x 8″ wood baseboard with three 15/64-inch holes drilled near the edges in a triangular pattern (1 per participant)
24″ wooden dowel rod (1/4″ diameter), cut into 3 pieces–2 long, 1 ~1″ shorter than the long pieces (1 rod/3 pieces per participant)
Wood glue, Elmer’s glue or Tacky Glue (1 per table)
30cc Luer Lock Syringes without needles (2 per participant)
Duct tape (1-2 rolls per table)
Clear, flexible acrylic tubing (1/8″ inner diameter x 3/16″ outer diameter) (2 feet of tubing per participant)–we found a box with a big roll of this tubing by visiting an American Science and Surplus.
Ruler (preferably 1 per participant)
Scissors (1 per participant)
Butterfly wing templates, roughly 5×7″ (1 per participant)
12×18″ 3mm colored foam sheet (1 per participant)
Pen, pencils, or markers for tracing (1 per participant)
Jumbo craft sticks (7 per participant)
Scotch tape or masking tape (1 roll per table)
Large bowl or container full of water
Hot glue gun (preferably a heavy duty one)
Assorted decorations for wings (pompoms, yarn, more foam, markers, googly eyes, etc)
How to How to Make a Hydraulic Butterfly instructions (1 per participant)
Cost: $$50-100
Advanced Preparation:
-Make a model hydraulic butterfly.
-Draw a butterfly wing outline that is roughly 5×7″ (for just one wing). Make copies and distribute 1 copy to each participant to cut out and trace for their project.
-Cut a ~5.5 x 8″ piece of wood for each participant’s base.
-Drill three 15/64″ holes near the edges in a triangular pattern on the pieces of wood. The holes on the outer edges support the two butterfly wings, so make sure that the holes are positioned properly with the size of your butterfly wing outlines.
-Cut a 24″ wood dowel into three pieces–2 long pieces of the same size, and 1 piece that is at least 1″ shorter than the longer pieces. Cut a dowel into 3 pieces for every participant.
-Print out How to Make a Hydraulic Butterfly instructions (1 per participant).
Program Outline:
- Welcome and introduction
- Brief explanation/demonstration of hydraulics and pneumatics, using a spare set of syringes and tubing as examples.
- Watch video: Hydraulics and Pneumatics, Part 1 (stop at 5:38 in video)
- Show model of hydraulic butterfly. Explain that each child will be making a butterfly with the help of parent/guardian.
- Make Hydraulic Butterflies.
Procedure:
Explanation/demonstration of hydraulics and pneumatics
 Although the butterflies work using hydraulics, we also included a brief demonstration of pneumatics (using air pressure to move things), as it provided a nice contrast to hydraulics. We first connected two syringes together with a tube and demonstrated how, as one plunger is pushed down, the other is moved up by the air pressure. Then, we removed one syringe and filled it with water. Once filled, we reconnected it to the tube and once more pushed a plunger down to see the other plunger rise. We talked about the differences in movement and had participants comment on what they saw. This was followed by an informative video on YouTube that explained the science nicely.
Making Hydraulic Butterflies
 Each child was given a set of instructions, and, with a parent’s help, followed the instructions to create a butterfly of their own.
A note of caution: In the instructions, careful mention is made of making sure there is no air in the tube or syringes. In our program, we discovered just how important this step is! Turns out, if there is too much air in either the tube or the syringe, when the hydraulic system is engaged, one side will literally pop off. One participant had their syringe pop apart and fly into the air because of too much air. Thankfully, no one was hurt, but it serves as a warning to really stress that no air should be in the system!
Handouts:
How to Make a Hydraulic Butterfly instructions
Resources Used:
Nucleus Learning: Teaching the Hydraulics and Pneumatics Unit to Children
YouTube: Hydraulic and Pneumatic, Part 1
What we would do differently:
 This program worked amazingly well as a family program. Parents were able to assist their children with the project, and encountered no difficulties (beyond the one instance of air in the hydraulic system) in creating their butterflies.
Our one spot of trouble involved the hot glue gun. The last time we presented this program, we used a heavy duty hot glue gun that was best handled by adults- so we librarians did all the gluing. That heavy duty hot glue gun is no longer with us, so we used our low temperature hot glue guns instead. These glue guns, while easier to handle, do not glue as well as the heavy duty glue gun. In order to have the hot glue work successfully, parents had to glue in two stages. First, a big dab of glue to hold the items in place, followed by a second round of glue to create a seal between the two objects being glued. It worked, but was more time consuming than necessary. It is well worth it to track down a heavy duty hot glue gun- or two!- to run this program.
Adaptation for older/younger audience:
As before, we do not recommend this program for anyone younger than 3rd grade, and the 3rd graders should definitely only participate with parental supervision.
For a teen audience, we recommend showing them the principles of hydraulics and have them design their own creations using those basic principles.
For our tween program, please see here.

Modified instructions for “Hydraulic Butterflies” were reprinted with permission from pages 98-103 of “Stomp Rockets, Catapults, and Kaleidoscopes: 30+ Amazing Science Projects You Can Build for Less Than $1” by, Curt Gabrielson and the City of Watsonville (Chicago Review Press, 2008). Please check out a copy of “Stomp Rockets, Catapults, and Kaleidoscopes: 30+ Amazing Science Projects You Can Build for Less Than $1″ by, Curt Gabrielson.
It’s full of fantastic projects!
